概述
源码版本信息
Project: kubernetes
Branch: master
Last commit id: d25d741c
Date: 2021-09-26
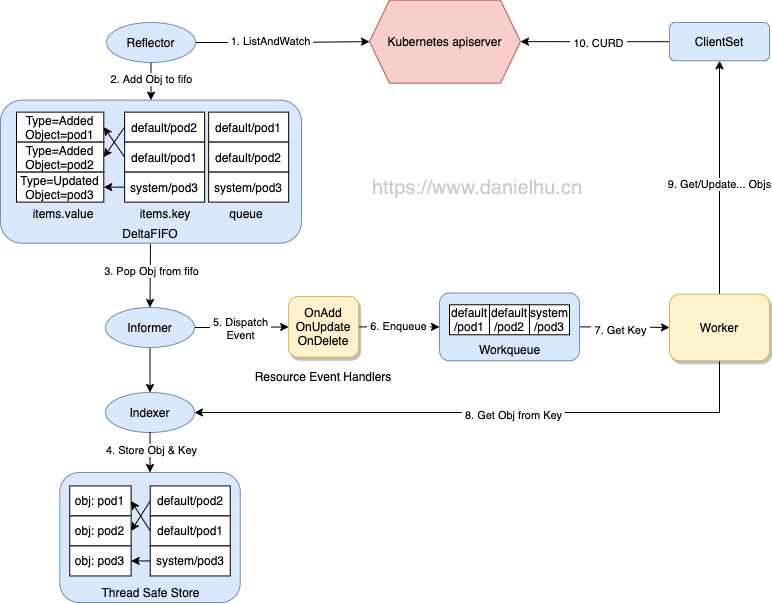
我们在《Kubernetes client-go 源码分析 - 概述》 里提到了自定义控制器涉及到的 client-go 组件整体工作流程,大致如下图:
client-go
今天我们来详细研究下 workqueue 相关代码。client-go 的 util/workqueue 包里主要有三个队列,分别是普通队列,延时队列,限速队列,后一个队列以前一个队列的实现为基础,层层添加新功能,我们按照 Queue、DelayingQueue、RateLimitingQueue 的顺序层层拨开来看限速队列是如何实现的。
Queue
接口和结构体
先看接口定义:
k8s.io/client-go/util/workqueue/queue.go:26
1
2
3
4
5
6
7
8
type Interface interface {
Add ( item interface {}) // 添加一个元素
Len () int // 元素个数
Get () ( item interface {}, shutdown bool ) // 获取一个元素,第二个返回值和 channel 类似,标记队列是否关闭了
Done ( item interface {}) // 标记一个元素已经处理完
ShutDown () // 关闭队列
ShuttingDown () bool // 是否正在关闭
}
这个基础的队列接口定义很清晰,我们继续来看其实现的类型:
 1
 2
 3
 4
 5
 6
 7
 8
 9
10
11
type Type struct {
queue [] t // 定义元素的处理顺序,里面所有元素都应该在 dirty set 中有,而不能出现在 processing set 中
dirty set // 标记所有需要被处理的元素
processing set // 当前正在被处理的元素,当处理完后需要检查该元素是否在 dirty set 中,如果有则添加到 queue 里
cond * sync . Cond // 条件锁
shuttingDown bool // 是否正在关闭
metrics queueMetrics
unfinishedWorkUpdatePeriod time . Duration
clock clock . Clock
}
这个 Queue 的工作逻辑大致是这样,里面的三个属性 queue、dirty、processing 都保存 items,但是含义有所不同:
queue :这是一个 []t 类型,也就是一个切片,因为其有序,所以这里当作一个列表来存储 item 的处理顺序。dirty :这是一个 set 类型,也就是一个集合,这个集合存储的是所有需要处理的 item,这些 item 也会保存在 queue 中,但是 set 里是无序的,set 的特性是里面元素具有唯一性。processing :这也是一个 set,存放的是当前正在处理的 item,也就是说这个 item 来自 queue 出队的元素,同时这个元素会被从 dirty 中删除。
下面分别介绍 set 类型和 Queue 接口的集合核心方法的实现。
set
上面提到的 dirty 和 processing 字段都是 set 类型,set 相关定义如下:
 1
 2
 3
 4
 5
 6
 7
 8
 9
10
11
12
13
14
15
16
type empty struct {}
type t interface {}
type set map [ t ] empty
func ( s set ) has ( item t ) bool {
_ , exists := s [ item ]
return exists
}
func ( s set ) insert ( item t ) {
s [ item ] = empty {}
}
func ( s set ) delete ( item t ) {
delete ( s , item )
}
可以看到 set 是一个空接口到空结构体的 map,也就是实现了一个集合的功能,集合元素是 interface{} 类型,也就是可以存储任意类型。而 map 的 value 是 struct{} 类型,也就是空。这里利用 map 的 key 唯一的特性实现了一个集合类型,附带三个方法 has()、insert()、delete() 来实现集合相关操作。
Add()
Add() 方法用于标记一个 item 需要被处理,代码如下:
 1
 2
 3
 4
 5
 6
 7
 8
 9
10
11
12
13
14
15
16
17
18
19
20
func ( q * Type ) Add ( item interface {}) {
q . cond . L . Lock ()
defer q . cond . L . Unlock ()
if q . shuttingDown { // 如果 queue 正在被关闭,则返回
return
}
if q . dirty . has ( item ) { // 如果 dirty set 中已经有了该 item,则返回
return
}
q . metrics . add ( item )
q . dirty . insert ( item ) // 添加到 dirty set 中
if q . processing . has ( item ) { // 如果正在被处理,则返回
return
}
q . queue = append ( q . queue , item ) // 如果没有正在处理,则加到 q.queue 中
q . cond . Signal () // 通知 getter 有新 item 到来
}
Get()
 1
 2
 3
 4
 5
 6
 7
 8
 9
10
11
12
13
14
15
16
17
18
19
func ( q * Type ) Get () ( item interface {}, shutdown bool ) {
q . cond . L . Lock ()
defer q . cond . L . Unlock ()
for len ( q . queue ) == 0 && ! q . shuttingDown { // 如果 q.queue 为空,并且没有正在关闭,则等待下一个 item 的到来
q . cond . Wait ()
}
if len ( q . queue ) == 0 { // 这时候如果 q.queue 长度还是 0,说明 q.shuttingDown 为 true,所以直接返回
return nil , true
}
item , q . queue = q . queue [ 0 ], q . queue [ 1 :] // 获取 q.queue 第一个元素,同时更新 q.queue
q . metrics . get ( item )
q . processing . insert ( item ) // 刚才获取到的 q.queue 第一个元素放到 processing set 中
q . dirty . delete ( item ) // dirty set 中删除该元素
return item , false // 返回 item
}
Done()
 1
 2
 3
 4
 5
 6
 7
 8
 9
10
11
12
func ( q * Type ) Done ( item interface {}) {
q . cond . L . Lock ()
defer q . cond . L . Unlock ()
q . metrics . done ( item )
q . processing . delete ( item ) // processing set 中删除该 item
if q . dirty . has ( item ) { // 如果 dirty 中还有,说明还需要再次处理,放到 q.queue 中
q . queue = append ( q . queue , item )
q . cond . Signal () // 通知 getter 有新的 item
}
}
DelayingQueue
接口和结构体
还是先看接口定义:
k8s.io/client-go/util/workqueue/delaying_queue.go:30
1
2
3
4
5
type DelayingInterface interface {
Interface
// AddAfter adds an item to the workqueue after the indicated duration has passed
AddAfter ( item interface {}, duration time . Duration )
}
相比 Queue 这里只是多了一个 AddAfter(item interface{}, duration time.Duration) 方法,望文生义,也就是延时添加 item。
结构体定义:
1
2
3
4
5
6
7
8
9
type delayingType struct {
Interface // 用来嵌套普通 Queue
clock clock . Clock // 计时器
stopCh chan struct {}
stopOnce sync . Once // 用来确保 ShutDown() 方法只执行一次
heartbeat clock . Ticker // 默认10s的心跳,后面用在一个大循环里,避免没有新元素时一直阻塞
waitingForAddCh chan * waitFor // 传递 waitFor 的 channel,默认大小 1000
metrics retryMetrics
}
对于延时队列,我们关注的入口方法肯定就是新增的 AddAfter() 了,看这个方法的具体的逻辑前我们先看下上面 delayingType 中涉及到的 waitFor 类型。
waitFor
先看下 waitFor 结构定义,代码如下:
1
2
3
4
5
type waitFor struct {
data t // 准备添加到队列中的数据
readyAt time . Time // 应该被加入队列的时间
index int // 在 heap 中的索引
}
然后可以注意到有这样一行代码:
1
type waitForPriorityQueue [] * waitFor
这里定义了一个 waitFor 的优先级队列,用最小堆的方式来实现,这个类型实现了 heap.Interface 接口,我们具体看下源码:
 1
 2
 3
 4
 5
 6
 7
 8
 9
10
11
12
13
14
15
16
17
18
19
20
21
// 添加一个 item 到队列中
func ( pq * waitForPriorityQueue ) Push ( x interface {}) {
n := len ( * pq )
item := x .( * waitFor )
item . index = n
* pq = append ( * pq , item ) // 添加到队列的尾巴
}
// 从队列尾巴移除一个 item
func ( pq * waitForPriorityQueue ) Pop () interface {} {
n := len ( * pq )
item := ( * pq )[ n - 1 ]
item . index = - 1
* pq = ( * pq )[ 0 :( n - 1 )]
return item
}
// 获取队列第一个 item
func ( pq waitForPriorityQueue ) Peek () interface {} {
return pq [ 0 ]
}
NewDelayingQueue
接着看一下 DelayingQueue 相关的几个 New 函数,理解了这里的逻辑,才能继续往后面分析 AddAfter() 方法。
 1
 2
 3
 4
 5
 6
 7
 8
 9
10
11
12
13
14
15
16
17
18
19
20
21
22
23
// 这里可以传递一个名字
func NewNamedDelayingQueue ( name string ) DelayingInterface {
return NewDelayingQueueWithCustomClock ( clock . RealClock {}, name )
}
// 上面一个函数只是调用当前函数,附带一个名字,这里加了一个指定 clock 的能力
func NewDelayingQueueWithCustomClock ( clock clock . Clock , name string ) DelayingInterface {
return newDelayingQueue ( clock , NewNamed ( name ), name ) // 注意这里的 NewNamed() 函数
}
func newDelayingQueue ( clock clock . Clock , q Interface , name string ) * delayingType {
ret := & delayingType {
Interface : q ,
clock : clock ,
heartbeat : clock . NewTicker ( maxWait ), // 10s 一次心跳
stopCh : make ( chan struct {}),
waitingForAddCh : make ( chan * waitFor , 1000 ),
metrics : newRetryMetrics ( name ),
}
go ret . waitingLoop () // 留意这里的函数调用
return ret
}
上面涉及到两个细节:
NewNamed(name)go ret.waitingLoop()
NewNamed() 函数用于创建一个前面提到的 Queue 的对应类型 Type 对象,这个值被传递给了 newDelayingQueue() 函数,进而赋值给了 delayingType{} 对象的 Interface 字段,于是后面 delayingType 类型才能直接调用 Type 类型实现的方法。
1
2
3
4
5
6
7
8
func NewNamed ( name string ) * Type {
rc := clock . RealClock {}
return newQueue (
rc ,
globalMetricsFactory . newQueueMetrics ( name , rc ),
defaultUnfinishedWorkUpdatePeriod ,
)
}
waitingLoop() 方法逻辑不少,我们单独放到下面一个小节
waitingLoop()
这个方法是实现延时队列的核心逻辑所在,
 1
 2
 3
 4
 5
 6
 7
 8
 9
10
11
12
13
14
15
16
17
18
19
20
21
22
23
24
25
26
27
28
29
30
31
32
33
34
35
36
37
38
39
40
41
42
43
44
45
46
47
48
49
50
51
52
53
54
55
56
57
58
59
60
61
62
63
64
65
66
67
68
69
70
71
72
73
74
75
func ( q * delayingType ) waitingLoop () {
defer utilruntime . HandleCrash ()
// 队列里没有 item 时实现等待用的
never := make ( <- chan time . Time )
var nextReadyAtTimer clock . Timer
// 构造一个优先级队列
waitingForQueue := & waitForPriorityQueue {}
heap . Init ( waitingForQueue ) // 这一行其实是多余的,功能上没有啥作用,不过在可读性上有点帮助。
// 这个 map 用来处理重复添加逻辑的,下面会讲到
waitingEntryByData := map [ t ] * waitFor {}
// 无限循环
for {
// 这个地方 Interface 从语法上来看可有可无,不过放在这里能够强调是调用了内部 Queue 的 ShuttingDown() 方法
if q . Interface . ShuttingDown () {
return
}
now := q . clock . Now ()
// 队列里有 item 就开始循环
for waitingForQueue . Len () > 0 {
// 获取第一个 item
entry := waitingForQueue . Peek ().( * waitFor )
// 时间还没到,先不处理
if entry . readyAt . After ( now ) {
break
}
// 时间到了,pop 出第一个元素;注意 waitingForQueue.Pop() 是最后一个 item,heap.Pop() 是第一个元素
entry = heap . Pop ( waitingForQueue ).( * waitFor )
// 将数据加到延时队列里
q . Add ( entry . data )
// map 里删除已经加到延时队列的 item
delete ( waitingEntryByData , entry . data )
}
// 如果队列中有 item,就用第一个 item 的等待时间初始化计时器,如果为空则一直等待
nextReadyAt := never
if waitingForQueue . Len () > 0 {
if nextReadyAtTimer != nil {
nextReadyAtTimer . Stop ()
}
entry := waitingForQueue . Peek ().( * waitFor )
nextReadyAtTimer = q . clock . NewTimer ( entry . readyAt . Sub ( now ))
nextReadyAt = nextReadyAtTimer . C ()
}
select {
case <- q . stopCh :
return
case <- q . heartbeat . C (): // 心跳时间是 10s,到了就继续下一轮循环
case <- nextReadyAt : // 第一个 item 的等到时间到了,继续下一轮循环
case waitEntry := <- q . waitingForAddCh : // waitingForAddCh 收到新的 item
// 如果时间没到,就加到优先级队列里,如果时间到了,就直接加到延时队列里
if waitEntry . readyAt . After ( q . clock . Now ()) {
insert ( waitingForQueue , waitingEntryByData , waitEntry )
} else {
q . Add ( waitEntry . data )
}
// 下面的逻辑就是将 waitingForAddCh 中的数据处理完
drained := false
for ! drained {
select {
case waitEntry := <- q . waitingForAddCh :
if waitEntry . readyAt . After ( q . clock . Now ()) {
insert ( waitingForQueue , waitingEntryByData , waitEntry )
} else {
q . Add ( waitEntry . data )
}
default :
drained = true
}
}
}
}
}
这个方法还有一个 insert() 调用,我们再来看一下这个插入逻辑:
 1
 2
 3
 4
 5
 6
 7
 8
 9
10
11
12
13
14
15
func insert ( q * waitForPriorityQueue , knownEntries map [ t ] * waitFor , entry * waitFor ) {
// 这里的主要逻辑是看一个 entry 是否存在,如果已经存在,新的 entry 的 ready 时间更短,就更新时间
existing , exists := knownEntries [ entry . data ]
if exists {
if existing . readyAt . After ( entry . readyAt ) {
existing . readyAt = entry . readyAt // 如果存在就只更新时间
heap . Fix ( q , existing . index )
}
return
}
// 如果不存在就丢到 q 里,同时在 map 里记录一下,用于查重
heap . Push ( q , entry )
knownEntries [ entry . data ] = entry
}
AddAfter()
这个方法的作用是在指定的延时到达之后,在 work queue 中添加一个元素,源码如下:
 1
 2
 3
 4
 5
 6
 7
 8
 9
10
11
12
13
14
15
16
17
18
func ( q * delayingType ) AddAfter ( item interface {}, duration time . Duration ) {
if q . ShuttingDown () { // 已经在关闭中就直接返回
return
}
q . metrics . retry ()
if duration <= 0 { // 如果时间到了,就直接添加
q . Add ( item )
return
}
select {
case <- q . stopCh :
// 构造 waitFor{},丢到 waitingForAddCh
case q . waitingForAddCh <- & waitFor { data : item , readyAt : q . clock . Now (). Add ( duration )}:
}
}
RateLimitingQueue
最后一个 workqueue 就是限速队列,我们继续来看。
接口和结构体
先看接口定义
k8s.io/client-go/util/workqueue/rate_limiting_queue.go:20
1
2
3
4
5
6
type RateLimitingInterface interface {
DelayingInterface // 延时队列里内嵌了普通队列,限速队列里内嵌了延时队列
AddRateLimited ( item interface {}) // 限速方式往队列里加入一个元素
Forget ( item interface {}) // 标识一个元素结束重试
NumRequeues ( item interface {}) int // 标识这个元素被处理里多少次了
}
然后看下两个 New 函数
 1
 2
 3
 4
 5
 6
 7
 8
 9
10
11
12
13
func NewRateLimitingQueue ( rateLimiter RateLimiter ) RateLimitingInterface {
return & rateLimitingType {
DelayingInterface : NewDelayingQueue (),
rateLimiter : rateLimiter ,
}
}
func NewNamedRateLimitingQueue ( rateLimiter RateLimiter , name string ) RateLimitingInterface {
return & rateLimitingType {
DelayingInterface : NewNamedDelayingQueue ( name ),
rateLimiter : rateLimiter ,
}
}
这里的区别就是里面的延时队列有没有指定的名字。注意到这里有一个 RateLimiter 类型,后面要详细讲,另外 rateLimitingType 就是上面接口的具体实现类型了。
RateLimiter
RateLimiter 表示一个限速器,我们看下限速器是什么意思。先看接口定义:
k8s.io/client-go/util/workqueue/default_rate_limiters.go:27
1
2
3
4
5
type RateLimiter interface {
When ( item interface {}) time . Duration // 返回一个 item 需要等待的时长
Forget ( item interface {}) // 标识一个元素结束重试
NumRequeues ( item interface {}) int // 标识这个元素被处理里多少次了
}
这个接口有五个实现,分别叫做:
BucketRateLimiter ItemExponentialFailureRateLimiter ItemFastSlowRateLimiter MaxOfRateLimiter WithMaxWaitRateLimiter
下面分别来看
BucketRateLimiter
这个限速器可说的不多,用了 golang 标准库的 golang.org/x/time/rate.Limiter 实现。BucketRateLimiter 实例化的时候比如传递一个 rate.NewLimiter(rate.Limit(10), 100) 进去,表示令牌桶里最多有 100 个令牌,每秒发放 10 个令牌。
 1
 2
 3
 4
 5
 6
 7
 8
 9
10
11
12
13
14
15
16
type BucketRateLimiter struct {
* rate . Limiter
}
var _ RateLimiter = & BucketRateLimiter {}
func ( r * BucketRateLimiter ) When ( item interface {}) time . Duration {
return r . Limiter . Reserve (). Delay () // 过多久后给当前 item 发放一个令牌
}
func ( r * BucketRateLimiter ) NumRequeues ( item interface {}) int {
return 0
}
func ( r * BucketRateLimiter ) Forget ( item interface {}) {
}
ItemExponentialFailureRateLimiter
Exponential 是指数的意思,从这个限速器的名字大概能猜到是失败次数越多,限速越长而且是指数级增长的一种限速器。
结构体定义如下,属性含义基本可以望文生义
1
2
3
4
5
6
7
type ItemExponentialFailureRateLimiter struct {
failuresLock sync . Mutex
failures map [ interface {}] int
baseDelay time . Duration
maxDelay time . Duration
}
主要逻辑是 When() 函数是如何实现的
 1
 2
 3
 4
 5
 6
 7
 8
 9
10
11
12
13
14
15
16
17
18
19
20
func ( r * ItemExponentialFailureRateLimiter ) When ( item interface {}) time . Duration {
r . failuresLock . Lock ()
defer r . failuresLock . Unlock ()
exp := r . failures [ item ]
r . failures [ item ] = r . failures [ item ] + 1 // 失败次数加一
// 每调用一次,exp 也就加了1,对应到这里时 2^n 指数爆炸
backoff := float64 ( r . baseDelay . Nanoseconds ()) * math . Pow ( 2 , float64 ( exp ))
if backoff > math . MaxInt64 { // 如果超过了最大整型,就返回最大延时,不然后面时间转换溢出了
return r . maxDelay
}
calculated := time . Duration ( backoff )
if calculated > r . maxDelay { // 如果超过最大延时,则返回最大延时
return r . maxDelay
}
return calculated
}
另外两个函数太简单了:
 1
 2
 3
 4
 5
 6
 7
 8
 9
10
11
12
13
func ( r * ItemExponentialFailureRateLimiter ) NumRequeues ( item interface {}) int {
r . failuresLock . Lock ()
defer r . failuresLock . Unlock ()
return r . failures [ item ]
}
func ( r * ItemExponentialFailureRateLimiter ) Forget ( item interface {}) {
r . failuresLock . Lock ()
defer r . failuresLock . Unlock ()
delete ( r . failures , item )
}
ItemFastSlowRateLimiter
快慢限速器,也就是先快后慢,定义一个阈值,超过了就慢慢重试。先看类型定义:
1
2
3
4
5
6
7
8
type ItemFastSlowRateLimiter struct {
failuresLock sync . Mutex
failures map [ interface {}] int
maxFastAttempts int // 快速重试的次数
fastDelay time . Duration // 快重试间隔
slowDelay time . Duration // 慢重试间隔
}
同样继续来看具体的方法实现
 1
 2
 3
 4
 5
 6
 7
 8
 9
10
11
12
13
14
15
16
17
18
19
20
21
22
23
24
25
26
func ( r * ItemFastSlowRateLimiter ) When ( item interface {}) time . Duration {
r . failuresLock . Lock ()
defer r . failuresLock . Unlock ()
r . failures [ item ] = r . failures [ item ] + 1 // 标识重试次数 + 1
if r . failures [ item ] <= r . maxFastAttempts { // 如果快重试次数没有用完,则返回 fastDelay
return r . fastDelay
}
return r . slowDelay // 反之返回 slowDelay
}
func ( r * ItemFastSlowRateLimiter ) NumRequeues ( item interface {}) int {
r . failuresLock . Lock ()
defer r . failuresLock . Unlock ()
return r . failures [ item ]
}
func ( r * ItemFastSlowRateLimiter ) Forget ( item interface {}) {
r . failuresLock . Lock ()
defer r . failuresLock . Unlock ()
delete ( r . failures , item )
}
MaxOfRateLimiter
这个限速器看着有点乐呵人,内部放多个限速器,然后返回限速最狠的一个延时:
 1
 2
 3
 4
 5
 6
 7
 8
 9
10
11
12
13
14
15
type MaxOfRateLimiter struct {
limiters [] RateLimiter
}
func ( r * MaxOfRateLimiter ) When ( item interface {}) time . Duration {
ret := time . Duration ( 0 )
for _ , limiter := range r . limiters {
curr := limiter . When ( item )
if curr > ret {
ret = curr
}
}
return ret
}
WithMaxWaitRateLimiter
这个限速器也很简单,就是在其他限速器上包装一个最大延迟的属性,如果到了最大延时,则直接返回:
 1
 2
 3
 4
 5
 6
 7
 8
 9
10
11
12
13
14
15
16
17
type WithMaxWaitRateLimiter struct {
limiter RateLimiter // 其他限速器
maxDelay time . Duration // 最大延时
}
func NewWithMaxWaitRateLimiter ( limiter RateLimiter , maxDelay time . Duration ) RateLimiter {
return & WithMaxWaitRateLimiter { limiter : limiter , maxDelay : maxDelay }
}
func ( w WithMaxWaitRateLimiter ) When ( item interface {}) time . Duration {
delay := w . limiter . When ( item )
if delay > w . maxDelay {
return w . maxDelay // 已经超过了最大延时,直接返回最大延时
}
return delay
}
限速队列的实现
看完了上面的限速器的概念,限速队列的实现就很简单了:
 1
 2
 3
 4
 5
 6
 7
 8
 9
10
11
12
func ( q * rateLimitingType ) AddRateLimited ( item interface {}) {
// 内部存了一个延时队列,通过限速器计算出一个等待时间,然后传给延时队列
q . DelayingInterface . AddAfter ( item , q . rateLimiter . When ( item ))
}
func ( q * rateLimitingType ) NumRequeues ( item interface {}) int {
return q . rateLimiter . NumRequeues ( item )
}
func ( q * rateLimitingType ) Forget ( item interface {}) {
q . rateLimiter . Forget ( item )
}
小结
在自定义控制器开发场景下,我们用到的 workqueue 其实是用的这里的延时队列实现,一个延时队列也就是实现了 item 延时入队效果,内部是一个“优先级队列”,用了“最小堆”(有序完全二叉树),从而我们在 requeueAfter 中指定一个调谐过程 1 分钟后重试,实现原理也就明白了。
转载请注明本文来自胡涛的个人网站 - https://www.danielhu.cn